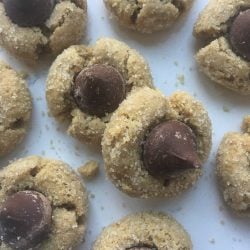
Classic Peanut Butter Blossoms
This Classic Peanut Butter Blossoms Recipe is a quintessential Christmas cookie, but I love to make it throughout the year. Made with a soft chewy center, loads of peanut butter flavor, and rich chocolate, this recipe is hard to beat!
Every year, my sister, Becky, makes a variety of holiday cookies for our annual holiday party. This lineup includes everything from buckeyes to biscotti and even those cute melted snowman cookies you see on Pinterest.
Everything is delicious. However, her recipe for classic peanut butter blossoms is my all-time favorite. They’re soft, sweet, and loaded with chocolate peanut butter flavor. To be honest, they’re so delicious I used to dream about them all year long and begged her for the recipe for years. Luckily, when I moved a few states away she finally agreed to give me the recipe.
And I’m extending the favor by sharing it with you! Serve these peanut butter blossoms on a platter with hot chocolate cookies and peanut butter cookies for holiday parties, give them as gifts, or enjoy them on your own. Either way, they’re sure to become a staple in your holiday baking routine. I know you’ll love them as much as I do!

Ingredients You’ll Need
- Shortening – While some recipes call for butter, I like to use shortening for a slightly lighter flavor and a chewy consistency.
- Peanut Butter – You can’t have a peanut butter blossom cookie recipe without peanut butter! Use creamy peanut butter for easy mixing.
- Sugar – I use a combination of granulated sugar and light brown sugar to sweeten the cookies while keeping them soft and moist.
- Milk – I highly recommend using 2% milk for the richest flavor. I haven’t tested it, but low-fat or even dairy-free milk should work if needed. Just keep in mind that the flavor will likely be slightly different.
- Vanilla Extract – Make sure to use pure vanilla extract, not imitation varieties.
- Salt – This helps enhance the flavor of the rest of the ingredients.
- All-Purpose Flour – We use this for the base of the dough. Again, I haven’t tested it, but a 1:1 all-purpose gluten-free flour should work if you need to keep these cookies gluten-free.
- Baking Soda – Make sure it’s fresh, or your cookies won’t rise!
- Hershey’s Kisses – Milk chocolate kisses are most common, but dark chocolate also tastes great!
How to Make the Best Peanut Butter Blossoms Recipe
- Prepare. Before you begin, preheat your oven to 375 degrees Fahrenheit.
- Combine. Mix the shortening and peanut butter in a large bowl. Then, add part of the granulated sugar and part of the light brown sugar. Use a hand mixer or stand mixer to beat until light and fluffy.
- Mix. Add the egg and vanilla extract, and mix again.
- Whisk the dry ingredients. In a separate bowl, whisk the flour, baking soda, and salt.
- Combine the wet and dry ingredients. Working slowly, stir the dry ingredients into the wet mixture just until smooth.
- Portion. Use a cookie dough scoop, spoon, or measuring cup to portion the dough, and roll it into 1-inch balls. Then, roll the balls in granulated sugar.
- Bake. Arrange the cookie dough on an ungreased cookie sheet, leaving space between each cookie. Then, transfer the baking sheet to the oven, and bake just until the cookies are lightly browned.
- Top. Immediately top each cookie with a Hershey’s Kiss.
- Cool. Allow your peanut butter blossom cookies to cool on the baking sheet slightly. Then, transfer them to a wire rack to cool completely, and enjoy!
Tips for Success
- Use a room-temperature egg. Let your egg come to room temperature before mixing it into the dough. This allows it to mix easily, preventing the dough from being overworked.
- Use a no-stir peanut butter. I don’t recommend using natural peanut butter for these cookies, because it tends to separate and can cause your cookies to become dry and crumbly.
- Measure carefully. As you probably know, baking is a science. Therefore, measuring your ingredients with a food scale is the easiest way to guarantee the best results. If that’s not an option, using the spoon and level method for dry ingredients is your next best bet!
- Freeze the chocolate kisses. If you’re worried about your chocolate kisses melting, freeze them for about ten minutes before placing them on top of the cookies.
- Avoid over baking. These peanut butter blossom cookies may look slightly underdone will remove them from the oven, but they’ll continue to bake and set as they cool.
Frequently Asked Questions
Why are my peanut butter blossoms dry? The most common causes of dry cookies are using too much flour, over-mixing, and over baking. Be sure to measure carefully, stir the dough just until smooth, and keep a close eye on the oven!
Can I make the dough ahead of time? Yes! You can store the cookie dough in an airtight container in the fridge for up to 3 days or in the freezer for up to 3 months. To freeze the dough, I recommend portioning it into balls. Then, freeze them on a baking sheet, and transfer them to an airtight container. Bake from frozen, or thaw them in the refrigerator overnight.
Do I have to use Hershey’s Kisses? Hershey’s Kisses are the classic candy used for peanut butter blossom recipes. However, you can use any chocolate candy you like best! Hugs and Reese’s peanut butter cups are popular variations.
How should I store leftover cookies? Store peanut butter blossoms in an airtight container at room temperature for up to 4 to 5 days.
Can I freeze this recipe? Yes, once cool, you can freeze leftover cookies for 1 to 2 months. I like to place a sheet of parchment paper or wax paper between each layer of cookies to prevent them from clumping together! Thaw in the fridge or at room temperature when you’re ready to eat, and they’ll taste good as new.
How to Make Classic Peanut Butter Blossoms
- Preheat the oven to 375 degrees Fahrenheit.
Combine the Wet Ingredients
- In a mixing bowl, combine the shortening and peanut butter, mixing until smooth.
- Add the granulated sugar and light brown sugar. Use a hand mixer or stand mixer to beat until fluffy.
- Add the egg, milk, and vanilla extract, and mix until smooth.
Combine the Dry Ingredients
- In a separate bowl, add the flour, baking soda, and salt. Whisk until well combined. Working slowly, mix the dry ingredients into the peanut butter mixture just until no streaks remain.
Bake the Cookies
- Portion the dough into 1-inch balls. Roll each cookie dough ball in granulated sugar.
- Arrange the cookies on an ungreased cookie sheet, leaving space between each cookie. Bake for 8-10 minutes or until lightly browned.
- Remove the cookies from the oven, and immediately press a chocolate kiss into the center of each cookie. The chocolate will melt slightly and adhere to the cookies.
- Allow the cookies to cool on the baking sheet slightly. Then, transfer them to a wire rack to cool completely.
How to Store
Make Ahead: Store the dough in an airtight container in the fridge for up to 3 days or in the freezer for up to 3 months. To freeze the dough, I recommend portioning it into balls. Then, freeze them on a baking sheet, and transfer them to a freezer-safe container. Bake from frozen, or thaw them at room temperature.
Store: Transfer leftover cookies to an airtight container or sealable bag, and store them at room temperature for 4-5 days.
Freeze Baked Cookies: Freeze cooked and cooled cookies for 1-2 months. I like to place a sheet of parchment paper or wax paper between each layer of cookies to prevent them from clumping together! Thaw in the fridge or at room temperature when you’re ready to eat, and they’ll taste good as new.
Classic Peanut Butter Blossoms
Ingredients
- ½ cup shortening
- ¾ cup peanut butter
- ⅓ cup granulated sugar
- ⅓ cup light brown sugar
- 2 tablespoons 2% milk
- 1 teaspoon vanilla extract
- ½ teaspoon salt
- 1.5 cups AP flour, all purpose
- 1 teaspoon baking soda
- 48 Hershey kisses – unwrapped
Equipment
- 1 cookie tray
- 2 mixing bowls
Instructions
Prepare the Oven
- Preheat the oven to 375 degrees Fahrenheit.
Combine the Wet Ingredients
- In a mixing bowl, combine the shortening and peanut butter, mixing until smooth.Add the granulated sugar and light brown sugar. Use a hand mixer or stand mixer to beat until fluffy.Add the egg, milk, and vanilla extract, and mix until smooth.
Combine the Dry Ingredients
- In a separate bowl, add the AP flour, baking soda, and salt. Whisk until well combined.
Assemble
- Working slowly, mix the dry ingredients into the peanut butter mixture just until no streaks remain. Portion the dough into 1-inch balls. Roll each cookie dough ball in granulated sugar.
Bake
- Arrange the cookies on an ungreased cookie sheet, leaving space between each cookie. Bake for 8-10 minutes or until lightly browned. Remove the cookies from the oven, and immediately press a chocolate kiss into the center of each cookie. The chocolate will melt slightly and adhere to the cookies. Allow the cookies to cool on the baking sheet slightly. Then, transfer them to a wire rack to cool completely.


One Comment on “Classic Peanut Butter Blossoms”
These are a must every year for the holidays. This recipe was just perfect. Cookies were soft and held their shape when the chocolate was added.